10. Understanding Simulation
A quick note about the practicals...
Remember that coding should be done in Spyder using the understandinggis virtual environment. If you want to install the environment on your own computer, you can do so using the instructions here.
You do not have to run every bit of code in this document. Read through it, and have a go where you feel it would help your understanding. If I explicitly want you to do something, I will write an instruction that looks like this:
This is an instruction.
Remember that we are no longer using Git CMD. You should now use GitHub Desktop for version control.
Don't forget to set your Working Directory to the current week in Spyder!
Shortcuts: Part 1 Part 2
In which we draw the course to a close by getting to grips with Agent Based Modelling…
Part 1
Before we get started - if you haven’t done so yet then please do take the time to fill in your course feedback - positive scores are very important to the teaching team as they are used to assess us, so please do take the time to fill it out!
Introduction
This week we are closing the course by delving into one of my current research areas: Agent Based Modelling (ABM). An ABM is a computer simulation that is used to replicate real life. In GIS applications, more often than not the “agents” are simulated people or animals, with their individual behaviour programmed into the model so that we can see what patterns are caused by those individual behaviours at the population level.
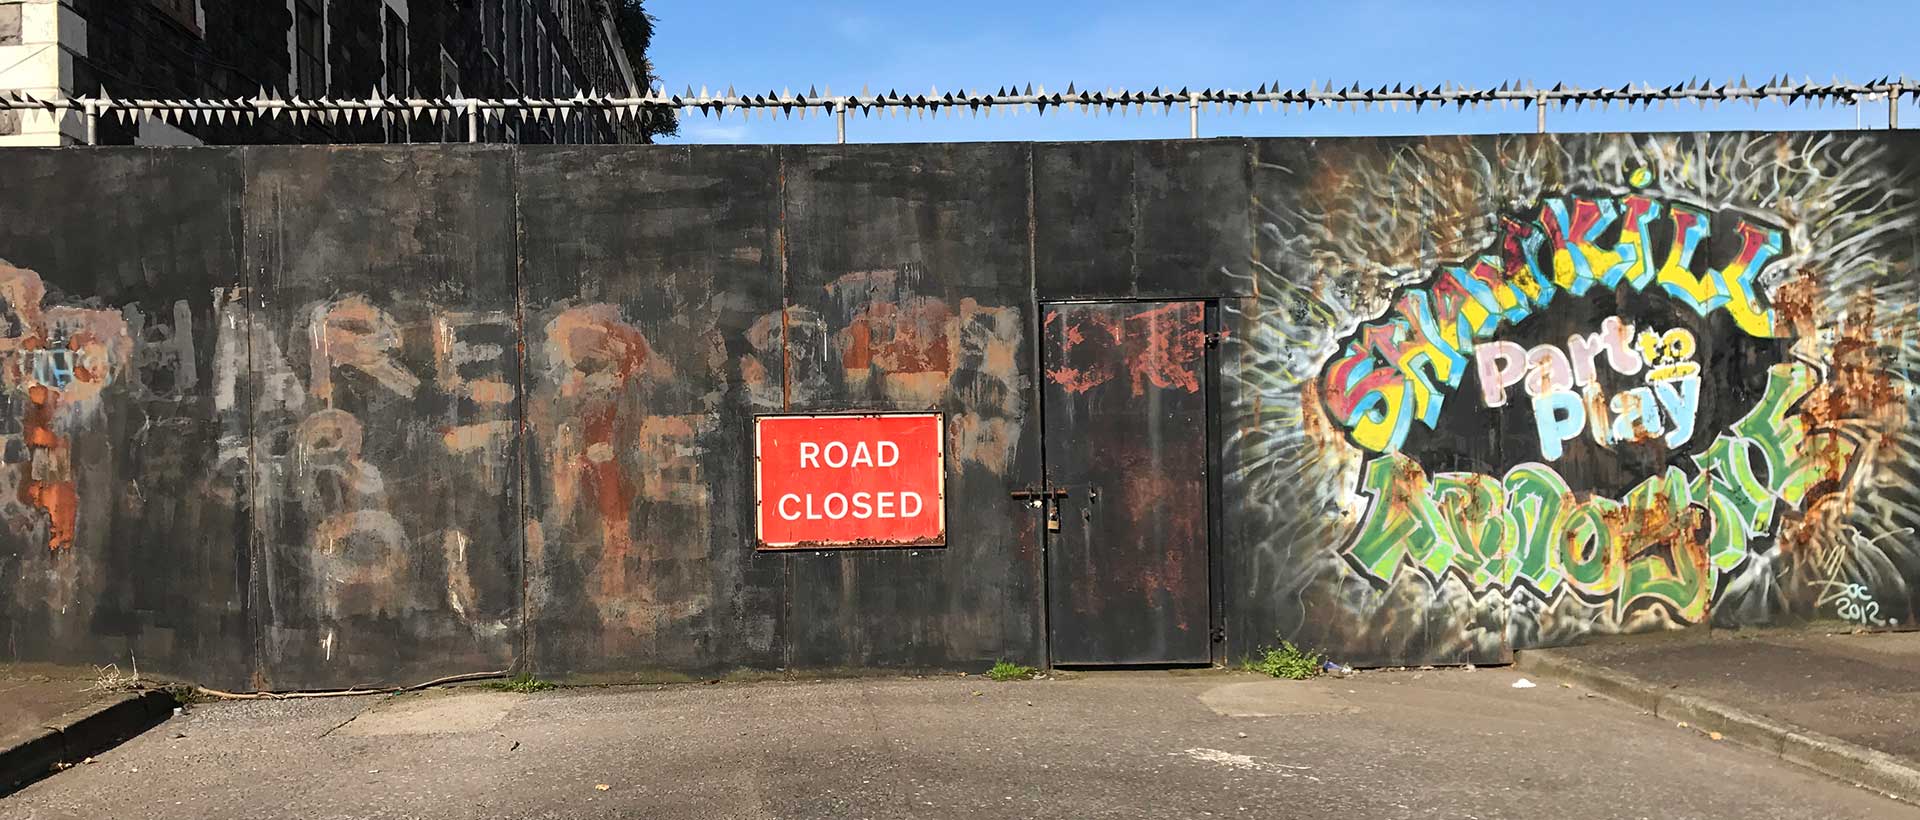
To illustrate this with my own research, I investigated the impact of segregation upon mobility in North Belfast using GNSS tracking data for c.200 people and questionnaire and Participatory GIS data from c.500 people. I analysed this dataset and used it to create a population of agents that then move around a map of North Belfast so that we can observe their behaviour at the population level, and then examine how their behaviour changes if we make some form of intervention (such as removing a peace wall, see below). Using this model, we can test interventions (e.g. the removal of peace walls that divide communities, such as the one below) before trying them out in real life, which allows us to catch problems and optimise solutions ahead of time - this especially useful in situations that could lead to conflict!
ABMs in geography are used to provide a bottom-up understanding of complex systems. This means that we use our understanding of how individual agents behave in order to understand the implications of those behaviours at the population level. Broadly speaking, they are generally used to answer one of two types of question:
- Understanding how a phenomenon occurs (i.e. how a pattern such as segregation develops)
- Evaluating the effect of some form of change or intervention upon a population (i.e. how removing a peace wall might affect segregated communities)
My example above was an illustration of a type 2 model. This week, we are going to create a model of type 1 by re-creating one of the earliest (and most famous) examples of an ABM: Schelling’s model of segregation.
Before we do that, however, we need to understand a part of the Python programming language that we have not yet examined in detail: the class. A class is simply the code that defines a particular object, and it is fundamental to object oriented programming.
Classes in Python
In object oriented programming, perhaps the most important element in a program is the class. In simple terms, we have already learned that an object is used to represent something. A class, is the way in which we define that object. We are already familiar with lots of classes from the course so far, including GeoDataFrame, LineString and Geod, for example. This week we will learn to create our own classes.
Consider the below code snippet:
# create a point
p = Point(x, y)
Here, we are creating an object called p, which is an instance of the class Point, (note that classes should always have a capital letter, whereas variables and functions never should). The code to define the Point class is below:
# this creates the class
class Point:

  # this is a 'class variable' - it is the same for every instance of a class
  area = 0

  def __init__(self, x, y)
    """
    * This __init__() function is called when an instance of the class is created
    * It handles the setup of the object (instance of this class) and is generally
    * referred to as a 'constructor'
    """
    # these are 'instance variables' - they can be different for every instance of a class
    self.x = x
    self.y = y
    self.coords = (x, y)
Here are some elements to note about the above class:
-
Note that there are two underscores on either side of
__init__(), not just one!! (you might remember that this is the same for other variable and function names that you have seen in Python, like__name__, for example). - Also note how the
__init__()function takes in three arguments, whereas the constructor in the snippet above it (Point(x, y)) has only two. This is because, in a class definition, there is always an extra argument calledselfthat is passed first - this is used to allow an instance of the class to refer to itself. - Class variables are for holding values in the class that would be the same for all instances of the class - these are defined inside the
classblock, but outside the__init__()function. For example, theareaof a point is always0, so would be a good example of where you would use a class variable. - Instance variables are for holding values in the class that could be different in all instances of the class - these are defined inside the
__init__()function using theself.prefix to denote that they are not just a normal variable, and that they should be accessible from the object. - Inside the class, both class variables and instance variables should be accessed using
self.(e.g.,self.x,self.area). When dealing with an instance of the class (as withpin the snippet above), you would simply usep.xorp.area.
Once we have our p variable containing our Point object, we are able to access these instance variables in the way that we are used to:
print(p.coords)
Which returns:
(345678, 456789)
Now consider this expanded version of our Point class:
from math import hypot

# this creates the class
class Point:

  def __init__(self, x, y):
    """
    * This function is called a constructor. It is called automatically
    * when an instance of the class is created, and is used to handle
    * the setup of an instance of this class (i.e. 'construct' it)
    """
    # this creates two instance variables to store the coordinates
    self.x = x
    self.y = y

    # the coordinates might also be available in combination as a list
    self.coords = (x, y)

  def distance(self, destination_point):
    """
    * This function measures the distance between the current point object
    * and another point object using Pythagoras Theorem
    """
    return hypot(self.x - destination_point.x, self.y - destination_point.y)
Now, we have a class that also contains a function (note that it also has self in its constructor). As you can see, this function calculates the distance between this Point object and another one that is passed as an argument (called destination_point). For example:
point_a = Point(345678, 456789)
point_b = Point(346678, 456789)
print(f"{point_a.distance(point_b)}km")
Which gives:
1000
Make sure that you understand the above information about classes (and note that I didn’t ask you to copy and paste any of it!!).
Create a new file
week12/week12.py(I know it is actuallyweek 11, but many of you used that directory last week - it doesn’t really matter which one you use as long as it is empty!)Using the example above, write a class called
Schellinginto your new file. Your__init__()function, should take 6 arguments:self,width,height,empty_ratio,similarity_threshold,n_iterations(obviously you do not need adistancefunction or thex/yinstance variables).Inside the
__init__()function, store each argument exceptselfin instance variables with the same name (selfis available for you already, and needs to be used to set the instance variables)Test that the above has worked by creating an instance of your class in your main code block using the below snippet
schelling = Schelling(25, 25, 0.25, 0.6, 500)
Note in the above snippet that the variable schelling has a lower case s, whereas the class Schelling has an upper case S. This distinction is vitally important (your code won’t work if you mix them up), and this is why it is important for you to follow the correct snake_case naming conventions for variables and functions in Python (or indeed any other programming language).
Now print out the value of each of the instance variables from your
schellingobject (Note: this should be done outside the class!)Once you are happy that you understand your class, delete the
print()statements
Part 2
Thomas Schelling (a US-based economist) published his model of segregation in the 1960’s (Schelling 1969), as an illustration of how challenging it is to combat racial segregation. His original model set up a line of random 0 and + characters to represent two ethnicities, with spaces to represent empty houses (dots identify individuals who are dissatisfied with their current location):
Note: The below two images should be interpreted as a straight line - they were drawn across two lines simply so that they would fit on the page in the original article!

He then made a rule in which individuals had a mild level of desire to live close to people of the same ethnicity: say half of the people within 4 characters of them, otherwise they would move to a new location. Schelling demonstrated that if you keep applying this rule until everyone is happy, you have quite severe levels of segregation, even if the desire to be near people of the same ethnicity is quite low:

Images from Schelling 1969
Over time he developed his model from one to two dimensions (Schelling 1971):
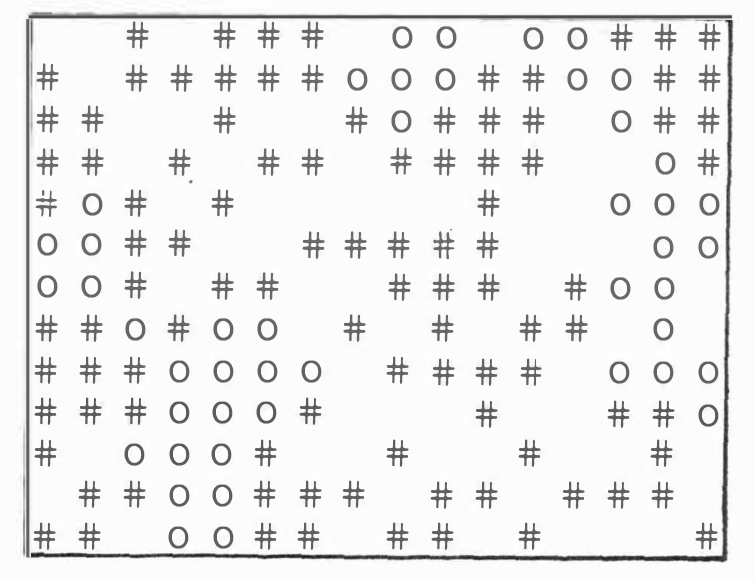
Image from Schelling 1971
When the model was eventually computerised it became perhaps the first example of an Agent Based Model (ABM). It is now considered a classic example of an ABM, and it has sparked hundreds of related research articles, as well as some interesting implementations (e.g., see this one for a fun example of what we will do today!).
An ABM is a classic example of object oriented programming, as it depends heavily on a system of classes.
An ABM is normally comprised of at least two classes:
- A class for the Model itself, which describes the mechanics of the model
- A class for the Agents, which describes all of the things that an agent can do and know
However, to keep things simple for today, and because the agents in a Schelling model are very simple creatures (they are only interested in who is next to them), we will start with just a single class (representing the model and including the agents) - and as luck would have it you already started making it in Part 1!
Note - in this practical, I have not specified the initial level of indent for each line - you will therefore need to use your understanding of Python to work this out and make sure that you are putting each line in the right place. Remember that, in Spyder, you can use Ctrl+] to tab highlighted blocks of code to the right, and Ctrl+[ to tab them to the left.
Building up our Class
You already have a class called Schelling (with a capital letter…) and a simple __init__() function that converts the five arguments into instance variables (we can ignore self as this is passed automatically).
Add another instance variable called
agents, as an empty dictionary ({}) - remember that it is an instance variable so you need to useself.to access it
Next, we need to create our list of houses, which are defined by the width and height instance variables. Here we will use list comprehension as a shorthand way of creating a nested loop (we have done this for a single loop before - but take note of how we are using it for a nested loop here!):
# get all house addresses
all_houses = [(x, y) for x in range(self.width) for y in range(self.height)]
The long-form of this statement (without list comprehension) would be:
all_houses = []
for x in range(self.width):
  for y in range(self.height):
    all_houses.append((x, y))
Make sure that you understand how list comprehension statement replaces the above nested loop, then add the above snippet (the version using list comprehension) to your code
all_houses, you should have a list of coordinate pairs, each representing a house, that looks something like this:
[(0, 0), (0, 1), (0, 2), ... (24, 22), (24, 23), (24, 24)]
A quick note on Random Number Generation: You will notice that in this practical we are using the built-in random library from Python, rather than the numpy.random library that we used in Understanding Distortion. This is purely because the functions available in random are a little more convenient for the purposes of what we are doing this week - both libraries are equally good!
Now we have our list of houses, we can start to randomly assign agents to them. There are a number of ways to do this, but the easiest is probably to shuffle the list of houses so that it is randomised, rather than trying to assign agents to houses at random (which can be trickier than it sounds). Luckily for us, there is a function called shuffle() built right into Python. As with all of the functions in the random library, the underlying pseudo-random number generator (PRNG) is the Mersenne Twister algorithm by Matsumoto & Nishimura (1997).
from random import shuffle
# shuffle the order of the houses
shuffle(all_houses)
Add the above two snippets to the appropriate location in your code and print the result. Has it worked?
Now we have our randomised list of houses, we can simply select blocks of houses from the list to assign to our three different groups:
- Empty houses
- Group 1 (let’s call them the red group)
- Group 2 (let’s call them the blue group)
Let’s start with the empty houses:
Calculate how many houses should be left empty using the
empty_ratioinstance variable (this describes the proportion of the total number of houses that should be empty)Convert your result to a whole number with the
int()function and store it in a variable calledn_empty
We can then assign our empty houses to the self.empty_houses instance variable simply by taking the first n_empty from the all_houses list using list slicing. Note how this is an instance variable because we need our instance of Schelling to be able to remember which houses are empty at any given point in the run of the model:
Add the below snippet to populate your
empty_housesinstance variable
# identify the empty houses with list slicing
self.empty_houses = all_houses[:n_empty]
Remember list slicing? Here’s how it works again (where a is a list):
a[start:stop]  		# get all elements from start to stop-1
a[start:]      		# get all elements from start to the end of the array
a[:stop]       		# get all elements from the beginning to stop-1
a[:]           		# get a copy of the whole array
a[start:stop:step] 	# get every step element from start to stop
a[start::step] 		# get every step element from start the end of the array
Add a temporary
print()statement to check your result, it should be a list of random houses with length equal ton_emptyIf that worked, use list slicing to get a second list containing all of the elements from
all_housesthat are not inempty_houses, store the result in a variable calledremaining_housesCheck your result with a
print()statement - if it worked, the combined length ofempty_housesandremaining_housesshould equal the length ofall_houses
Now we know which houses we need to populate with agents. To do this, we are going to use list slicing to add all of the houses in the list with even numbered indexes to the red group, and all of those with odd numbered indexes to the blue group.
We can do this by combining both list slicing and list comprehension, in order to extract the even numbers (every other element in the list starting from index 0) and odd numbers (every other element in the list starting from index 1) and then making them into a list in the form [(x,y), group].
Make sure that you understand how this is achieved for the red group in the below snippet
# get the agents for each group using list slicing and comprehension
red_group = [[coords, 'red'] for coords in remaining_houses[0::2]]	# every other cell from 0 to the end
Once you understand, add it to your code and then make an equivalent for
blue_group
Now we will combine those two lists (using the + operator, which means concatenate when applied to lists) and make them into a single dictionary using dict():
# add both sets of agents to the instance variable
self.agents.update(dict(red_group + blue_group))
As you will remember, a dictionary is a data structure in Python that is a set of key and value pairs in the form {key:value, key:value, ...} (in this case the coordinates will be the key, and the group to which the agent belongs will be the value). The key in a dictionary replaces the index in a list, meaning that each element can be referenced by its coordinate location, rather than an arbitrary index.
Add the above snippet to your code, then add a temporary statement to
print()self.agents
It will look something like this:
{ (19, 4): 'red', (12, 7): 'red', ... (2, 5): 'blue', (21, 5): 'blue' ... }
For example, if I wanted to access the group of the agent in the top left house, I would reference it with something like…
print(self.agents[(0,0)])
…and it would tell me the group contained in that house! As you can (hopefully) tell, this is a very convenient approach, as we can easily use it to look up the group to which a given house belongs! Warning: if you want to run this statement to test it, it is possible that you will get a KeyError - this is simply because this house is empty so it not in the dictionary! If you wanted you could, of course manage this with a try-except statement…
Mapping our Model
Now we have our set of agents randomly distributed around our houses, we can take a look at them!
To do this, add the below import statement to your code, then the
plotfunction to yourSchellingclass (think about the Indentation to ensure that it is inside the class!) and finally the third snippet to your main code block (after you create yourSchelling()instance):
from matplotlib.pyplot import subplots, savefig, subplots_adjust
def plot(self, my_ax, title):
  """
  * Plot the current state of the model
  """
  my_ax.set_title(title, fontsize=10, fontweight='bold')
  my_ax.set_xlim([0, self.width])
  my_ax.set_ylim([0, self.height])
  my_ax.set_xticks([])
  my_ax.set_yticks([])

  # plot agents one by one
  for agent in self.agents:

    # we can use the agent's group name as the colour directly!
    my_ax.scatter(agent[0]+0.5, agent[1]+0.5, color=self.agents[agent])
# initialise plot with two subplots (1 row, 2 columns)
fig, my_axs = subplots(1, 2, figsize=(14, 6))

# reduce the gap between the subplots
subplots_adjust(wspace=0.1)

# plot the initial state of the model into the first axis
schelling.plot(my_axs[0], 'Initial State')

# output image
savefig(f"./out/10.png", bbox_inches='tight')
print("done")
Here, we have split the work of drawing the plot between our main code block and a function called Schelling.plot() - this is a little bit like the GeoDataFrame.plot() function that we have been using throughout the course, it handles drawing the current state of the model for us directly, we simply need to provide it with an axis to draw to!
In this case, we are drawing two subplots, which will give us two side-by-side figures (many of you have done this already in Assessment 1!). This will allow us to see both the initial state of the model, and the state after it has completed (when all of the agents are satisfied) side-by-side to allow for easy comparison.
If all has gone to plan, you should have a random mixture of red, blue and empty houses, something like this (note that the image on the right is blank, as we haven’t done anything with it yet!):

Remember that this is a stochastic model (it has randomness in it) - your result will not look exactly like mine, and if you run it twice you will get a different result both times!
Testing Agent Satisfaction
Now we have our set of agents and they have all been given a house, we need to tell them how to behave. Agent behaviour can be defined by anything from the output of complex behavioural analysis (as is the case in my current research) to simple sets of rules (as demonstrated by Schelling). We will be using the latter, and so we need to make a function that tests whether or not each agent is satisfied, based upon the similarity_threshold that is passed to the Schelling object when it is created. If, for example, the similarity_threshold was 0.6, then an agent will only be satisfied if 60% or greater of his neighbours (the surrounding 8 houses) are from the same group.
We therefore need to be able to check the contents of each of the 8 neighbours of our agent. To do this, we will firstly define a list of adjacent cells, which we will store in a class variable, which (as described above) differ from instance variables in that they are the same for every instance of the class (whereas instance variables can be different, as you already know).
As you saw in Part 1, class variables are created inside the class, but NOT inside one of the functions (normally, you would put them just above the __init__() function). Because they are not inside any of the class functions, they do not have access to the self variable - and so you simply define them as normal, but when you come to use them you should access them via self..
Making a neighbour list is quite simple, you just need to make a nested loop, where both the outer and inner loops range() from -1 to 1, which are the relative coordinates of the neighbouring cells:
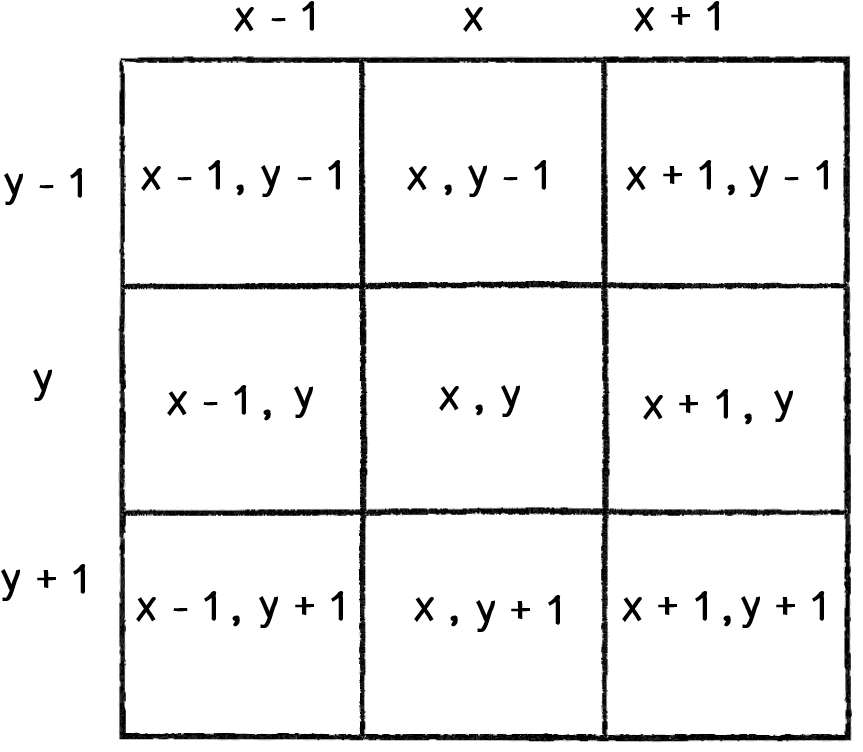
Image from Shiffman (2012)
Note that this is the same as the image space neighbours list that we created in Understanding Surfaces I! Last time, we hard-coded the list of neighbours into our software. This time, we will generate it dynamically.
As this is making a list from another list, we will use list comprehension, which is more elegant than writing the loops out in long-form. However, this would normally return you 9 relative cell locations (above), one of which will be (0,0), which is the current location of our agent. We do not want this (we just want the 8 neighbours), so we can avoid adding it to the list with by incorporating an if statement into the list comprehension:
# class variable containing list of neighbours
neighbours = [ (i, j) for i in range(-1, 2) for j in range(-1, 2) if (i, j) != (0, 0) ]
Note how we need to use range(-1, 2) and not range(-1, 1) because the upper limit is excluded by range() (so the result will be -1, 0, 1 ).
Also remember (as described above) that you do not need to use self. when you define a class variable, BUT you do need to use self.neighbours when you refer to it later from inside the class functions; or instance.neighbours if you wanted to access it outside of the class (where instance is the name of the variable containing your Schelling object).
Make sure that you understand how the above snippet works (particularly the
ifstatement) and then copy it into your code immediately after theSchellingclass definition (before the definition of__init__()), so it is inside the class, but not inside a functionAdd a temporary
print()statement to test that the list of neighbours is as expected (see the above image…)Now, create a new function inside your
Schellingclass calledis_unsatisfied()that takes in two arguments:selfandagent.Initialise two variables inside the function called
count_similarandcount_differentand set them both to0- these will be used to keep track of how many neighbours are in the same and different groupNow, open a
forloop that will iterate through all 8 members ofself.neighbours, usingnas the iterator variable
Inside this loop, we are going to check if each neighbouring agent is from either the same or a different group, and update the relevant counter accordingly. As with the raster datasets, however, we will occasionally go off the edge of the data (e.g. if we are checking the neighbours of an agent located on the end of a row), which will cause a KeyError exception. This is also true of empty houses, which we have not stored in our dictionary (which only contains those that are red or blue), so we definitely need to deal with this!
In the spirit of EAFP, we will not check whether or not the neighbouring house exists (i.e. if it is off the edge of the map) or if it is empty, but rather we will use a try-except statement to catch the KeyError exception that would occur if either of these situations arose (because in both cases the coordinates that we passed to the self.agents dictionary would not exist). Here it is:
try:
	# log whether the group of the neighbour matches the agent
	if self.agents[(agent[0]+n[0], agent[1]+n[1])] == self.agents[agent]:
		count_similar += 1
	else:
		count_different += 1

# if we go off the edge of the map or house is empty, there is nothing to do
except KeyError:
	continue
Take particular note of: self.agents[(agent[0]+n[0], agent[1]+n[1])] == self.agents[agent]. This takes the coordinates of the agent, and adds the corresponding relative position from n (the current cell) to get the neighbour coordinates (again, just like in Understanding Surfaces I). For example, if we were agent ((10, 10)) and we wanted the coordinates of the neighbour to the left of it (-1, 0), I would simply add those numbers to the coordinate: (10, 10) + (-1, 0) = (9, 10).
Once we have calculated the neighbour’s coordinates in this way, we simply use them as the key in the self.agents dictionary, to return the associated value, which is the name of the group (red or blue) of the agent at that location. We then simply compare that to the group of the current agent (self.agents[agent]) to see if it is the same.
Make sure that you understand the above snippet. If you don’t quite get it - print out the separate components from the description above to allow you to explore them and understand it better. If you get stuck, just ask!
When you are sure that you ‘get it’, add it to your code inside the loop that you just created.
Finally, we want to determine whether or not the agent is unsatisfied, i.e., whether more of the neighbours are from the ‘other’ group than is permitted by the specified threshold (0.6 in this case, which means at least 60% must be from the same group, and so up to 40% can be from the ‘other group’ before the agent becomes unsatisfied).
All that we need to do then is:
-
Check the ratio between the number of neighbours in the same group vs the number of neighbours that the agent actually has (i.e. those that are not empty and not off the map)
-
Compare this with the specified value (
self.similarity_threshold, which is ` 0.6` in this case). If the result is less than the threshold, then the agent is unsatisfied
Once again, we use an EAFP model in order to catch a ZeroDivisionError that could arise if the number of neighbours is 0 (which could happen if you were near the edge and/or happened to have a lot of empty houses around you!). In this case, the agent would clearly be satisfied, so we can return False. Here it is:
try:
  # return whether or not the proportion of similar neighbours meets the threshold
  return count_similar / (count_similar + count_different) < self.similarity_threshold

# catch the situation when there are only empty neighbours
except ZeroDivisionError:

  # if this is the case they will be satisfied
  return False
Note that we have used a comparison test (using the < operator) to directly return a True or False value, rather than using a more long winded if statement. This is a good example of elegant coding.
Make sure that you understand the above snippet and add it after your loop - pay particular attention to the
returnstatement
Take another look at the above statement, note the use of the brackets around (count_similar + count_different) - remember that Python (and pretty much any other computer language) will follow the BODMAS (Brackets, Other, Division, Multiplication, Addition, Subtraction) order when it encounters multiple mathematical operators in a single statement.
return count_similar / (count_similar + count_different) would therefore be interpreted as:
a = count_similar + count_different
return count_similar / a
Whereas return count_similar / count_similar + count_different would be interpreted as:
a = count_similar / count_similar
return a + count_different
These will give different answers - so the use of the brackets to force the correct order in the equation is of vital importance here!
Make sure that you can see how we use the Brackets to force the order of the equation, ensuring that the Addition takes place before the Division
At this point, you can now check the level of satisfaction of your agents:
Check that the function works with the below temporary
print()statement - it just turns the agents dictionary into a list , returns the first one and passes it tois_unsatisfied()(think about where you are going to put it to make it work!):
print(schelling.is_unsatisfied(list(schelling.agents.keys())[0]))
If the above works, it should return True or False. If so, then great!
Remember to remove the above
print()statement again - it is just for testing!
Running the Model
Now we have set up our class, and created a function by which we can determine the behaviour of the agents (if is_unsatisfied() returns True then they move house, otherwise they stay), the final step is to create the code required to run our model.
Create a function called
run()in yourSchellingclass that takes no arguments (but will still require the mandatoryselfargument)
When we initialised the model, we set the mandatory upper limit of times that the model should allow the agents to move (the number of iterations of the model) before it should give up (to avoid an infinite loop!). Using the argument n_iterations we will start by setting up a loop to run this many times:
Using
range(), create aforloop to iterate from1toself.n_iterations+1, call the loop variablei
Note that we are looping from 1 to n_iterations+1, rather than the usual 0 to n_iterations - this is simply because we want to use the loop variable (i) as a counter for the number of iterations that the model, and we want the first iteration to be 1, not 0.
Initialise a variable inside your loop called
n_changesand set it to0, this will count the number of agents that needed to move in each iteration in order to be satisfied
Remember Deep and Shallow Copies?
The first thing that we want to do in this function is to make a copy of our agents that we can edit. As you will remember from Understanding Generalisation, copying an object in computing is not quite as simple as you would think…
As you will remember, copying an object in Python using the = operator simply creates a reference to the same object in memory, so if we edit one of them then the other will be changed too (as we have two pointers to the same object in memory). If we want to make a copy for editing, then we need to make either a shallow or deep copy:
A shallow copy (achieved using the copy() function from the copy library) will create a new object, but anything contained within that object will still be a reference to the original object. For example, if you copy a list, you would get a new list, but each element in the list would be a reference to the same object in memory as is contained in the old list. This approach is therefore fine if you want to be able to remove elements from, or add elements to the list - but would not be any help if you wanted to edit the elements themselves, as they would be edited in both lists. This is the approach that we used in our implementation of the Visvalingam-Whyatt algorithm in Understanding Generalisation, as we were simply removing elements (coordinate pairs) from the list as we simplified the LineString; and so a shallow copy was sufficient.
However, if we wanted to be able to edit the elements in that list - then we would need to make a deep copy (achieved using the deepcopy() function from the copy library). This creates a new object, and everything else contained within it will also be a new object, meaning that it no longer has any relationship with the original object. For example, if you deep copied a list, it would return a new list, plus every element in the list would be duplicated into a new object, stored in a different location in memory. With a deep copy, any changes to the copied object or its elements will not be reflected in the original.
You can read more about deep and shallow copies here, and the key elements are summarised here:
| Type | Operator / Function | When to use |
|---|---|---|
| assignment copy (get a new pointer to the existing location in memory) | = |
When you are not going to edit the copied object |
| shallow copy (get a new copy of the object, but all elements contained inside are pointers to the existing locations in memory) | copy() |
When you will edit the object, but not the elements contained within it |
| deep copy (get a new copy of the object and all of the elements within) | deepcopy() |
When you will edit the elements contained within the object |
It is well worth making sure that you get the hang of deep and shallow copies, accidentally editing both copies of an object because it is a shallow copy is a common mistake in programming, particularly in Agent Based Modelling!
Because we know that we want to be able to edit the individual elements in our agents list, we will make a deep copy:
from copy import deepcopy
# create a new copy of the agents
self.old_agents = deepcopy(self.agents)
Make sure that you understand the above information about what a deep copy is, and add the above snippets to your code in the appropriate locations (the second snippet should be inside your loop)
Now, open a second loop inside the first that loops through every agent in
self.old_agents, calling the loop variableagent
This way, we can loop through a static copy of the agents from the last iteration of the model (self.old_agents), and can happily update our self.agents list without affecting the original.
Make sure that you understand that - if not, ask!
Inside the loop, we are now going to test if each agent is satisfied with their current position:
Add an
ifstatement to test ifself.is_unsatisfied()returnsTrue(remember that you do not need to use== Trueas this statement would just evaluate toTrueanyway!)
If so, then the agent needs to move house. We can achieve this with the following steps:
- randomly select a new house for them to live in
- update the location of the agent in the
self.agentsdictionary - update the
self.empty_houseslist to reflect the move - increment the
n_changescounter
Here we go then:
1: pick a new house to live in: once again, this needs to be a random choice, and once again the random library in Python has a handy choice() function for us to use:
# randomly choose an empty house for them to move to
empty_house = choice(self.empty_houses)
Make sure that you understand how the above snippet works and add it to your code - remember to add the necessary
importstatement to get thechoicefunction from therandomlibrary
2: update the location of the agent in the self.agents dictionary: The easiest way to achieve this is simply to add the new location to the list, and then remove the old one (note the use of the del statement to delete the old agent from the dictionary):
# add the new / remove the old location of the agent's house
self.agents[empty_house] = self.agents[agent]
del self.agents[agent]
These are the changes that we do not want to be reflected in our self.old_agents dictionary, and therefore necessitate the deep copy that we did above.
Make sure that you understand how the above snippet works and add it to your code
3: update the self.empty_houses list to reflect the move: As with the above, the simplest approach is simply to append() the new house and remove() the old one:
# add the new / remove the old house from the list of empty houses
self.empty_houses.append(agent)
self.empty_houses.remove(empty_house)
Make sure that you understand it, then add the above snippet to your code
4: increment the n_changes counter:
Add 1 to the value in the
n_changesvariable
Now, exit the code block for the self.old_agents loop. It is time to add a report for the user (so that they can see the progress at each iteration) and to add a stop condition for the loop (as we don’t expect it to reach the maximum number of iterations). We do this by checking if there were any changes in the last iteration, and if not (i.e., if n_changes == 0), then we end the loop using break statement:
# update the user
print(f"Iteration: {i+1}, Number of changes: {n_changes}")

# stop iterating if no changes happened
if n_changes == 0:
  print(f"\nFound optimal solution at {i+1} iterations\n")
  break
Add the above snippet to the end of your
self.n_iterationsloop:Finally, after the loop has completed,
returntheivariable, to let the calling code know how many iterations ran.
And that is it!!
Add a call to
schelling.run()in your main block of code (after your first call toschelling.plot()), storing the result in a variable callediterations.Then, add another call to
schelling.plot()to report your result, using something like the below:
# add the overall title into the model
fig.suptitle(f"Schelling Model of Segregation ({schelling.similarity_threshold * 100:.2f}% Satisfaction after {iterations} iterations)")

# plot the result into the second axis
schelling.plot(my_axs[1], "Final State")
This will set the “Super Title” (suptitle) of the figure, as well as add the final state of the model to the second axis in the figure.
If all has gone to plan, you should have built yourself a society that has segregated itself, even with only a relatively moderate desire to live amongst people from their own group! Remember that this is a stochastic model (it has randomness in it) - your result will not look exactly like mine, and if you run it twice you will get a different result both times!
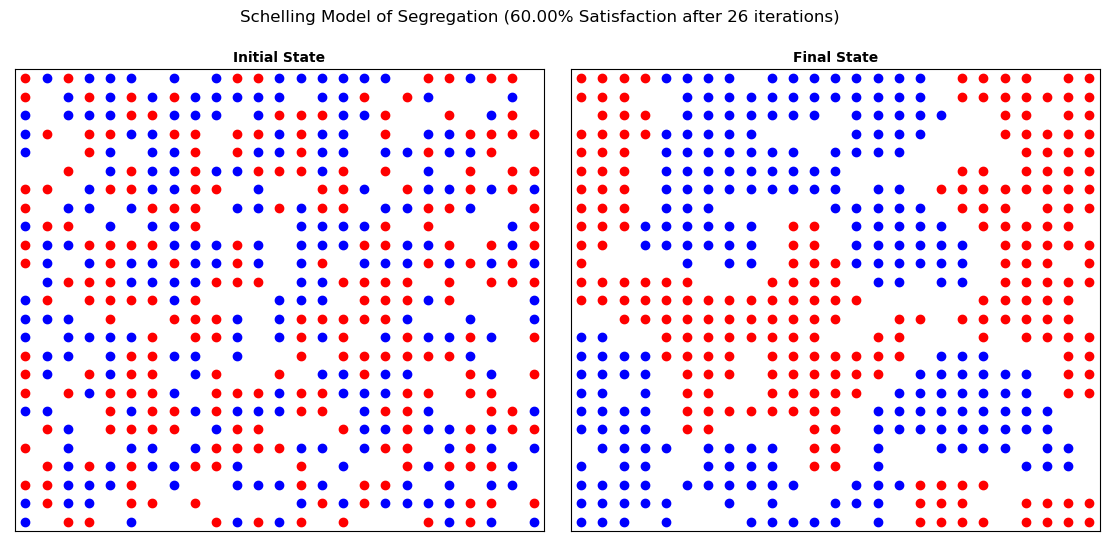
It is amazing how a relatively low level of desire to live around people from the same group leads to such high levels of segregation!
If it has worked, then congratulations! You have made your very own Agent Based Model!
A little more…?
If you want to go a little further, let’s have a go at making this replicable!
First, run the model a few times and observe that it is not currently replicable - you should get a different output image and a different number of iterations each time
Now, let’s set the seed (the input parameter) for the Mersenne Twister PRNG (provided by the random library). This is essentially the number that it starts with. If this is set, then it should always produce the same sequence of pseudo-random numbers, meaning that your work is replicable. If you do not provide a seed, then Python will come up with one for you, normally based on the timestamp at which you called the command.
You can set the PRNG seed using the seed() function from the random library:
from random import seed
seed(1824)
Make sure that you understand what the PRNG seed is and add the above snippets to your code at the appropriate locations. Remember that you can use any seed that you like (I tend to use 1824 purely because it is on the University logo!)
As above, you can choose any number to be your PRNG seed, and anyone using the same PRNG and seed should always get the same sequence of numbers as you! This is useful for scientific applications (e.g. an Agent based Model), as it means that someone can replicate exactly what you do. Clearly for most other applications (e.g. computer games, gambling applications, cyber security etc.) this would be a bad thing as you would not want the numbers to be predictable. There are several prominent examples of where this has gone wrong over the years, such as Michael Larson, who won over $110,237 by cheating on the gameshow Press your Luck in 1983 (the equivalent to about $320,000 today)!!
Run your code several times, it should now give the same result every time!
If so, then congratulations! You have made your very own replicable Agent Based Model!
…And more importantly, you have completed this course!!
Thankyou all very much for the past semester. I hope that you have found this course challenging yet enjoyable, and crucially that you feel that you have left the desert of despair and that you are now in a position where you can continue learning to code under your own steam.
I really hope that you do - it is worth it!
Jonny.