Since we were able to get it installed in Week 2, I am now recommending that you use GitHub Desktop instead of Git CMD to manage your version control.
Contents:
- Converting to GitHub Desktop from Git CMD
- Using GitHub Desktop with your existing repository
- Using GitHub Desktop to clone a new copy of your repository
GitHub Desktop is installed in the HBS and ALB computer labs already. If you are working on your own machine, then you need to ake sure that you have Installed GitHub Desktop
Open it, and log in.
Converting to GitHub Desktop from Git CMD
As we didn’t have access to GitHub Desktop at the start of the course, you are set up to use Git CMD. To simpify the transition and get the greatest benefit out of GitHub Desktop, we will make some minor adjustments to our repository (you only need to do this step once in the labs, and once on your own machine). I recommend doing it ASAP, and then not using Git CMD any more.
Specifically, what we will do here is switch the GitHub connection for our repository from SSH to HTTPS (so we can stop worrying about the keys).
First, double click on the Desktop icon to connect to your P Drive
Now, open GitCMD and set it up so it is pointing at your git repository (enter as three commands, press Enter after each one, and read any outputs to see if you get any errors):
NOTE: if you are on your own machine you should not run these commands, instead, you just need to adjust the cd path accordingly
P:
cd UGIS\understandinggis
git config --global core.sshCommand "ssh -i P:/.ssh/id_ed25519"
Now go to your GitHub repository (on the website), click the green button and get the HTTPS address for your repository (you may remember you got the SSH one last time, we are going to change from SSH to HTTPS for GitHub Desktop).
Update the below command to replace the
...with your HTTPS address and run it in Git CMD
git remote set-url origin ...
For example, mine would be git remote set-url origin https://github.com/jonnyhuck/understandinggis.git. Your’s will look something like: git remote set-url origin https://github.com/gis-123456789/understandinggis.git.
To test it works, run this command in Git CMD, this should print out the HTTPS address that you just entered:
git remote get-url origin
If so then great, you’re ready to start using GitHub Desktop!
Using GitHub Desktop with your existing repository
For most of you, all you will need to do is point GitHub Desktop at your existing understandinggis repository. Here’s how:
Use the Windows menu to open GitHub Desktop (if you are on a Mac, just open it from Spotlight or your your Applications directory) and make sure you are logged in.
Either select Add an Existing Repository from your Local Drive and browse to your
understandinggisdirectory, or simply drag and drop yourunderstandinggisdirectory from Windows Explorer (or Mac Finder) into the GitHub Desktop Window - then press Add Repository

You are now set up and ready to go! If you keep the Changes tab open, then any edits you make in your repository will appear in the list.
Here is how to use it:
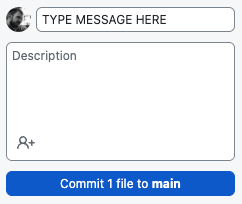
- When you are ready to commit, simply add a short message to the Summary box (ignore the Description) and click the blue Commit to main button.
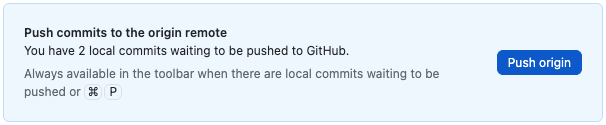
- When you are ready to push (I would just do this every time you commit), either click the blue Push origin button that appears in the panel on the right (which will only be there just after you commit), or the Push origin button in the black bar at the top (which is always there).
 OR
OR 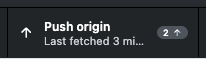
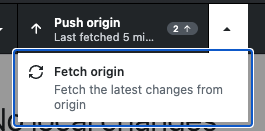
- If you have switched machine, then you will need to sync your local repository to the remote. To do this, click on the small arrow next to the Push origin button in the black bar at the top, and select Fetch Origin
Using GitHub Desktop to clone a new copy of your repository
If you are adding your repository to a new machine, then you will need to follow these steps:
Create a directory called
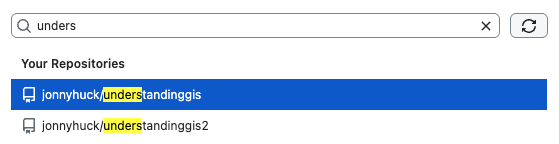
UGISsomewhere on your system - probably in your Documents.Select your
understandinggisdirectory in the list on the left and click the blue clone button at the bottom

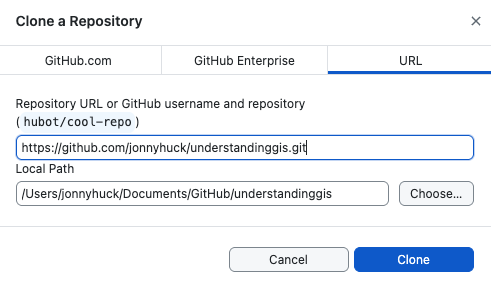
In the box that pops up, use the Choose button to navigate to your
UGISdirectory, this is where it will store the local version of yourunderstandinggisrepository
It will take a few seconds to do the clone and you are then ready to go. There is just one more step…
In Spyder, open and run the
download_data.pyscript (watch the outputs to monitor progress, as it will take a little while) - this will install the necessary datasets for the course in yourUGISdirectory.
You are now set up and ready to go! If you keep the Changes tab open, then any edits you make in your repository will appear in the list.
Here is how to use it:
- When you are ready to commit, simply add a short message to the Summary box (ignore the Description) and click the blue Commit to main button.
- When you are ready to push (I would just do this every time you commit), either click the blue Push origin button that appears in the panel on the right (which will only be there just after you commit), or the Push origin button in the black bar at the top (which is always there).
OR
- If you have switched machine, then you will need to sync your local repository to the remote. To do this, click on the small arrow next to the Push origin button in the black bar at the top, and select Fetch Origin