NOTE: We not have GitHub Desktop in the lab, so I strongly recommend using that instead of Git CMD. For GitHub Desktop instructions, see here.
This page explains how to set up Git (popular open source version control software), and GitHub (a popular online Git repository manager owned by Microsoft). Repository is simply the term used to describe a coding project in a version control system. All of your practical code will be stored in one repository, and your two assessments will each be stored in their own independent repositories . It is important to recognise that these are completely unrelated - you can use Git fine without GitHub (but you can’t use GitHub without Git).
Both of these are standard in the programming industry, and employers will normally expect you to have a working knowledge of Git (including remote repositories like GitHub) before they hire you.
This page includes setup instructions for three different scenarios (please make sure you use the right one!):
- Setting up Git in a University Computer Lab
- Setting up Git on your own Windows Machine
- Setting up Git on your own Mac
It also includes some reminders for Git usage:
- Git Recap (quick refresher on Git commands)
- Git Cheatsheet (detailed examples of Git commands)
Further information on generating an SSH Key Pair (for Mac, Windows and Linux) and adding a new SSH key to your GitHub account is availabile on from Github, but please be aware that the information from the GitHub website will not work in the University computer labs.
Setting Up Git in a University Computer Lab
Here are the steps to set up Git in the computer lab:
-
First, double click on the P Drive icon on your Desktop - this ensures that your P Drive has been properly mounted on the machine (which is not always the case!)
-
Set up an account on GitHub with the username
gis-[student number], for example, if you had student number123456789, then your user account would begis-123456789. Please do this even if you already have another GitHub account - but only do it once for this course!. -
Log in to GitHub and leave your Github page open in your browser. If you have completed Step 1 previously, log in and leave the page open now.
-
Open and log in to Apps Anywhere and select
Git- this will open an ugly, old fashioned looking software window, which you can safely ignore. -
Now, go into Start → Programs → Git (which will have appeared when you loaded Git from Apps Anywhere) and select Git CMD, a black command window should open.
-
The first step is to find a way for GitHub to authenticate you (instead of a username and password) when you interact with it via Git. This is achieved using an SSH Key Pair.
We will discuss SSH Key Pairs in the first lecture, but for now it is sufficient to know that it is a pair of files containing random characters, one of which goes on your computer (the private key) and one of which goes on GitHub (the public key) - if you have the matching private key to the public key that you give to GitHub, then you are authenticated and there is no need for a username or password - simple!
To generate a SSH key copy the below command (make sure you get the whole thing), then Right Click → Paste (not Ctrl+V!) it into Git CMD and press Enter:
P: && ssh-keygen -t ed25519 -C "MyLaptop" -N "" -f P:\.ssh\id_ed25519 && icacls P:\.ssh\id_ed25519 /inheritance:r /grant:r %USERNAME%:R && echo . && type P:\.ssh\id_ed25519.pub && clip < P:\.ssh\id_ed25519 && echo . && echo YOUR PUBLIC KEY IS NOW COPIED TO YOUR CLIPBOARD && echo .This will create your SSH Key set the permissions appropriately and store it on your clipboard for you (just like if you had copied it). If all goes to plan, you should get a result like this:
Generating public/private ed25519 key pair.
Your identification has been saved in P:/.ssh/id_ed25519
Your public key has been saved in P:/.ssh/id_ed25519.pub
The key fingerprint is:
SHA256:5u5EcF0Ks+Bxm0T/kLHPXcQaisIQpu0nvr2TaDNDms4 GISLabs
The key's randomart image is:
+--[ED25519 256]--+
|      =o* . .  ..|
|     =.= O *  ...|
|    . +o= B. . o.|
|     . oo .=.... |
|      o S.  + .  |
|     ..*         |
|     +..o.       |
|   .o *=o        |
|   .E..==o       |
+----[SHA256]-----+
Successfully processed 1 files; Failed processing 0 files

ssh-ed25519 AAAAC3NzaC1lZDI1NTE5AAAAIAv93zx6cbmPpS7hGvcE5gKg/dL7iBoTEmqQZJcvExji GISLabs

YOUR PUBLIC KEY IS NOW COPIED TO YOUR CLIPBOARD
The line that looks like this
ssh-ed25519 AAAAC3NzaC1lZDI1NTE5AAAAIAv93zx6cbmPpS7hGvcE5gKg/dL7iBoTEmqQZJcvExji GISLabsis the key itself - just in case you accidentally lose it from your clipboard before the next step. -
Now, you have generated your keys, we need to give the public key to GitHub. Make sure you are still logged in to GitHub in your web browser then click here to go to the correct page on GitHub (if that doesn’t work, click on your profile image → Settings in the top-right corner of the screen, select SSH and GPG Keys from the menu on the left, then click the Green New SSH Key button).
You should now see this screen:
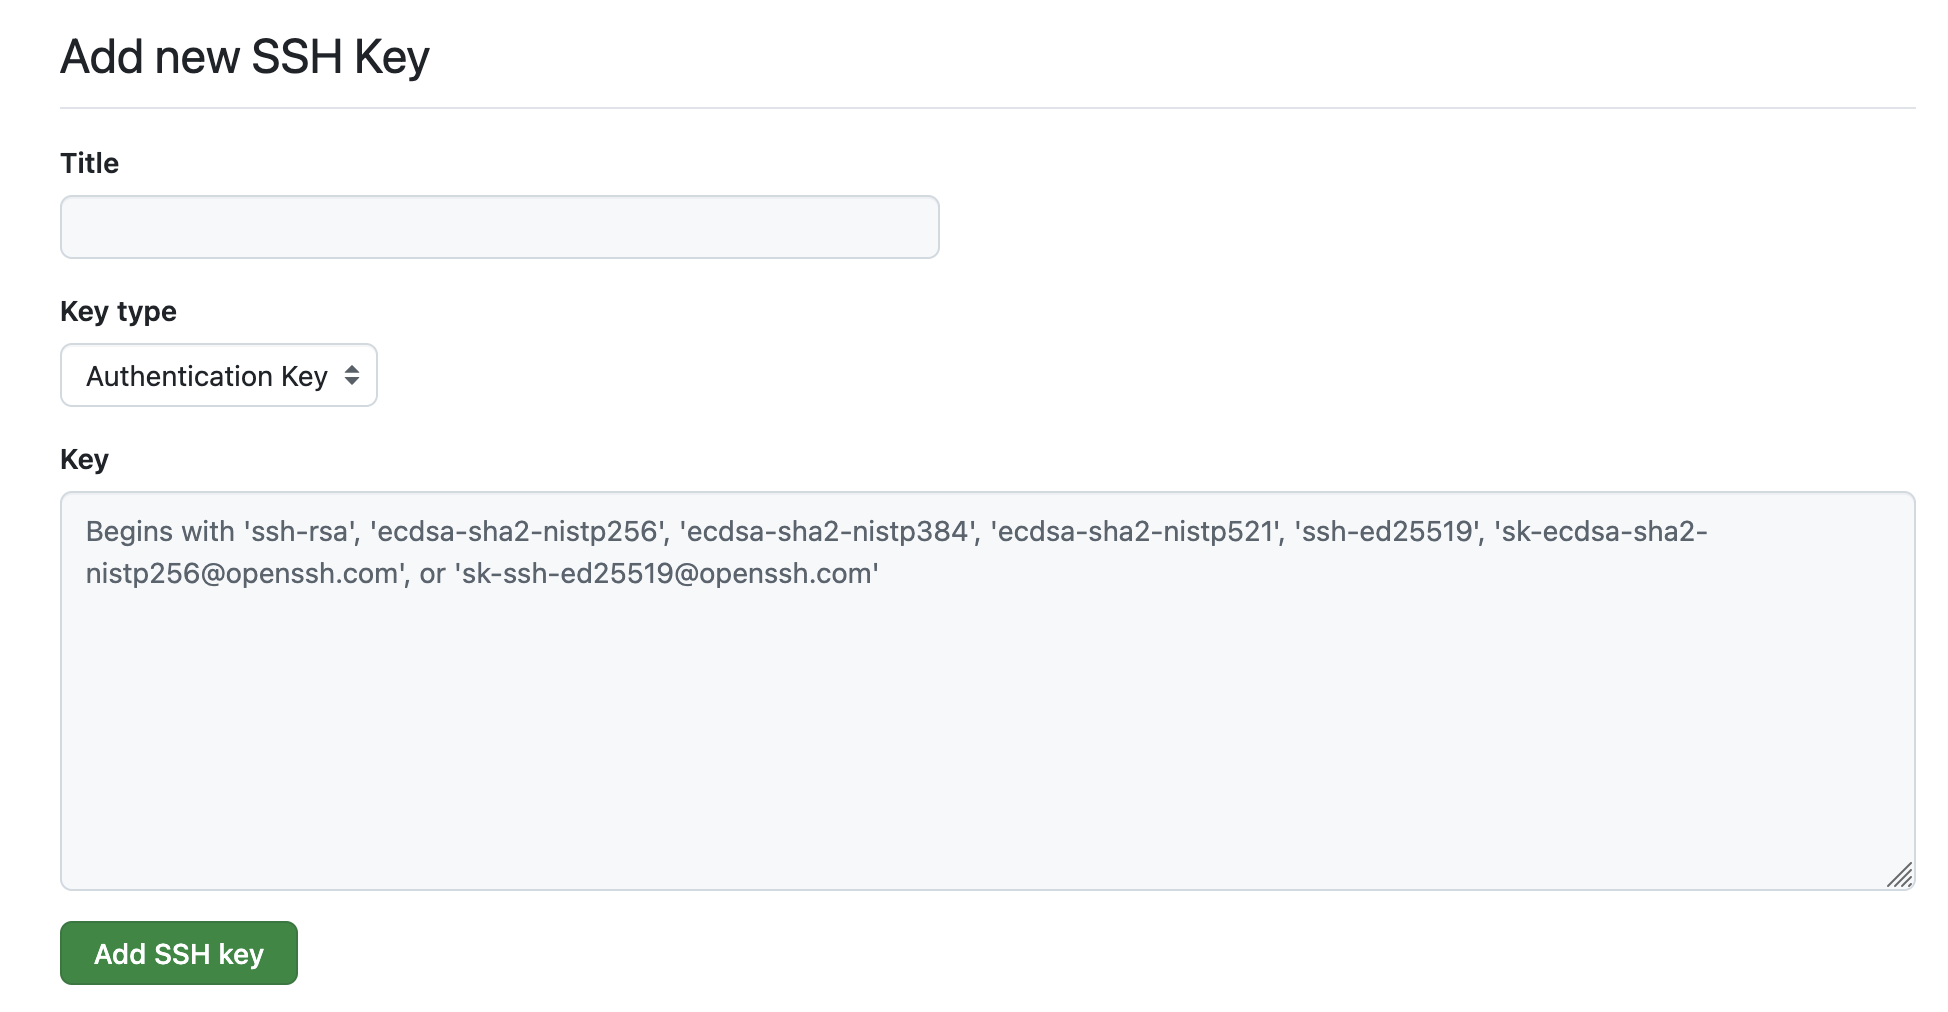
Now, paste your public key (which is already on your clipboard) it into the Key box on GitHub, then fill in the Title box to
GISLab, and click the green Add SSH Key button to finish: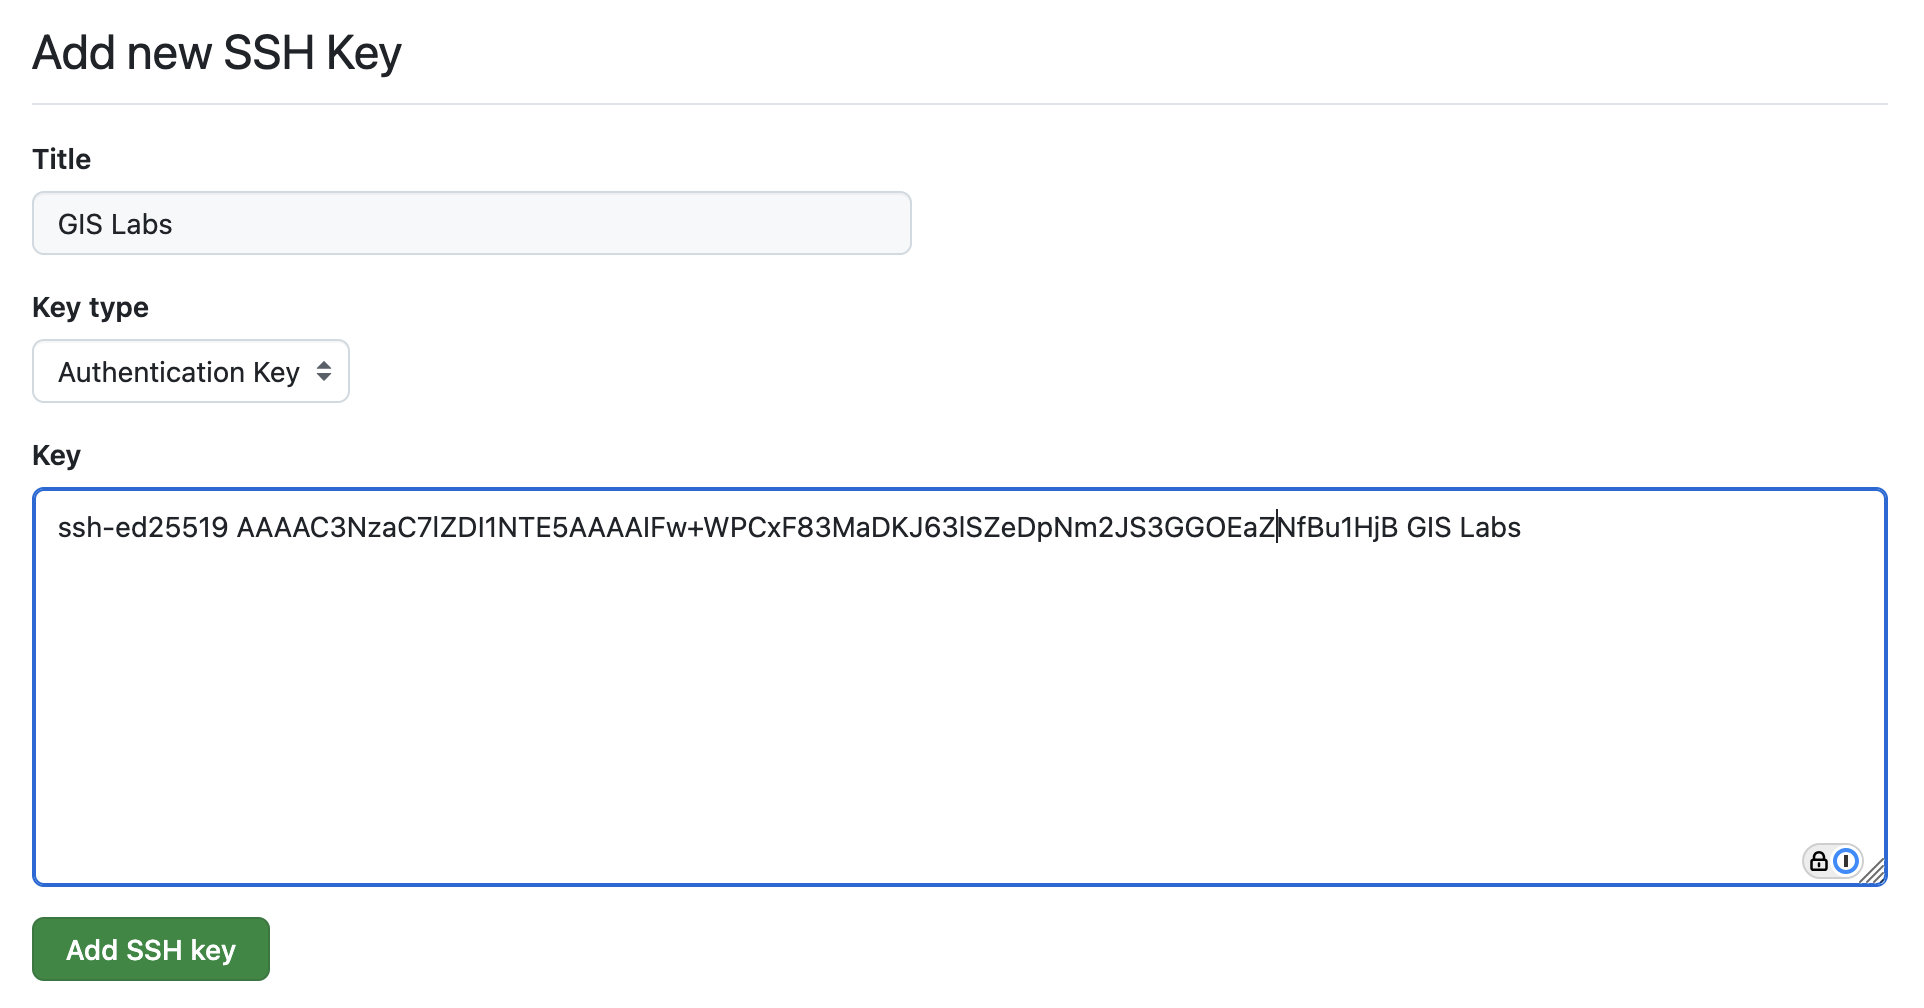
If all has gone to plan, you should now be able to see it listed in your SSH & GPG Keys page:

-
Once that is done, copy and paste (Right Click to Paste) the following lines one by one into Git CMD (replace
123456789with your student ID number, andyour.name@postgrad.manchester.ac.ukwith your UoM email address - remember to setstudent.orpostgrad.as required) and press Enter after each one:git config --global user.name "gis-123456789" git config --global user.email "your.name@postgrad.manchester.ac.uk" git config --global core.sshCommand "ssh -i P:/.ssh/id_ed25519"Once you have done that, congratulations! You have set up Git in the labs and and linked it to your GitHub profile. These changes will follow you around any machine and computer lab using the P drive, so you should have no need to do this process again!
Setting up Git on your own Windows machine
Here are the steps to set up Git on your own Windows machine:
-
Set up an account on GitHub with the username
gis-[student number], for example, if you had student number123456789, then your user account would begis-123456789. Please do this even if you already have another GitHub account - but only do it once for this course!. -
Log in to GitHub and leave your Github page open in your browser. If you have completed Step 1 previously, log in and leave the page open now.
-
Install the correct version of Git for your machine (probably x64 Setup if you aren’t sure).
-
Now, in the search bar (on the Taskbar at the bottom) type Git CMD and open it. A black command window should open.
-
The first step is to find a way for GitHub to authenticate you (instead of a username and password) when you interact with it via Git. This is achieved using an SSH Key Pair.
We will discuss SSH Key Pairs in the first lecture, but for now it is sufficient to know that it is a pair of files containing random characters, one of which goes on your computer (the private key) and one of which goes on GitHub (the public key) - if you have the matching private key to the public key that you give to GitHub, then you are authenticated and there is no need for a username or password - simple!
To generate a SSH key copy the below command (make sure you get the whole thing), then Right Click to paste it into Git CMD and press Enter:
ssh-keygen -t ed25519 -C "MyLaptop" -N "" && echo . && type "%USERPROFILE%\.ssh\id_ed25519.pub" | clip < "%USERPROFILE%\.ssh\id_ed25519.pub" && echo . && echo YOUR PUBLIC KEY IS NOW COPIED TO YOUR CLIPBOARD && echo .It may ask you some questions (like where you want to store the key file), if so, just press Enter to accept the default values until it finishes.
Once complete, it will have created your SSH Key and stored it on your clipboard (just like if you had copied it) for you. If all goes to plan, you should get a result like this:
Generating public/private ed25519 key pair.
Your identification has been saved in .ssh/id_ed25519
Your public key has been saved in .ssh/id_ed25519.pub
The key fingerprint is:
SHA256:5u5EcF0Ks+Bxm0T/kLHPXcQaisIQpu0nvr2TaDNDms4 MyLaptop
The key's randomart image is:
+--[ED25519 256]--+
|      =o* . .  ..|
|     =.= O *  ...|
|    . +o= B. . o.|
|     . oo .=.... |
|      o S.  + .  |
|     ..*         |
|     +..o.       |
|   .o *=o        |
|   .E..==o       |
+----[SHA256]-----+

ssh-ed25519 AAAAC3NzaC1lZDI1NTE5AAAAIAv93zx6cbmPpS7hGvcE5gKg/dL7iBoTEmqQZJcvExji MyLaptop


YOUR PUBLIC KEY IS NOW COPIED TO YOUR CLIPBOARD
The line that looks like this
ssh-ed25519 AAAAC3NzaC1lZDI1NTE5AAAAIAv93zx6cbmPpS7hGvcE5gKg/dL7iBoTEmqQZJcvExji MyLaptopis the key itself - just in case you accidentally lose it from your clipboard before the next step. -
Now, you have generated your keys, we need to give the public key to GitHub. Make sure you are still logged in to GitHub in your web browser then click here to go to the correct page on GitHub (if that doesn’t work, click on your profile image → Settings in the top-right corner of the screen, select SSH and GPG Keys from the menu on the left, then click the Green New SSH Key button).
You should now see this screen:
Now, paste your public key (which is already on your clipboard) it into the Key box on GitHub, then fill in the Title box to
MyLaptop, and click the green Add SSH Key button to finish: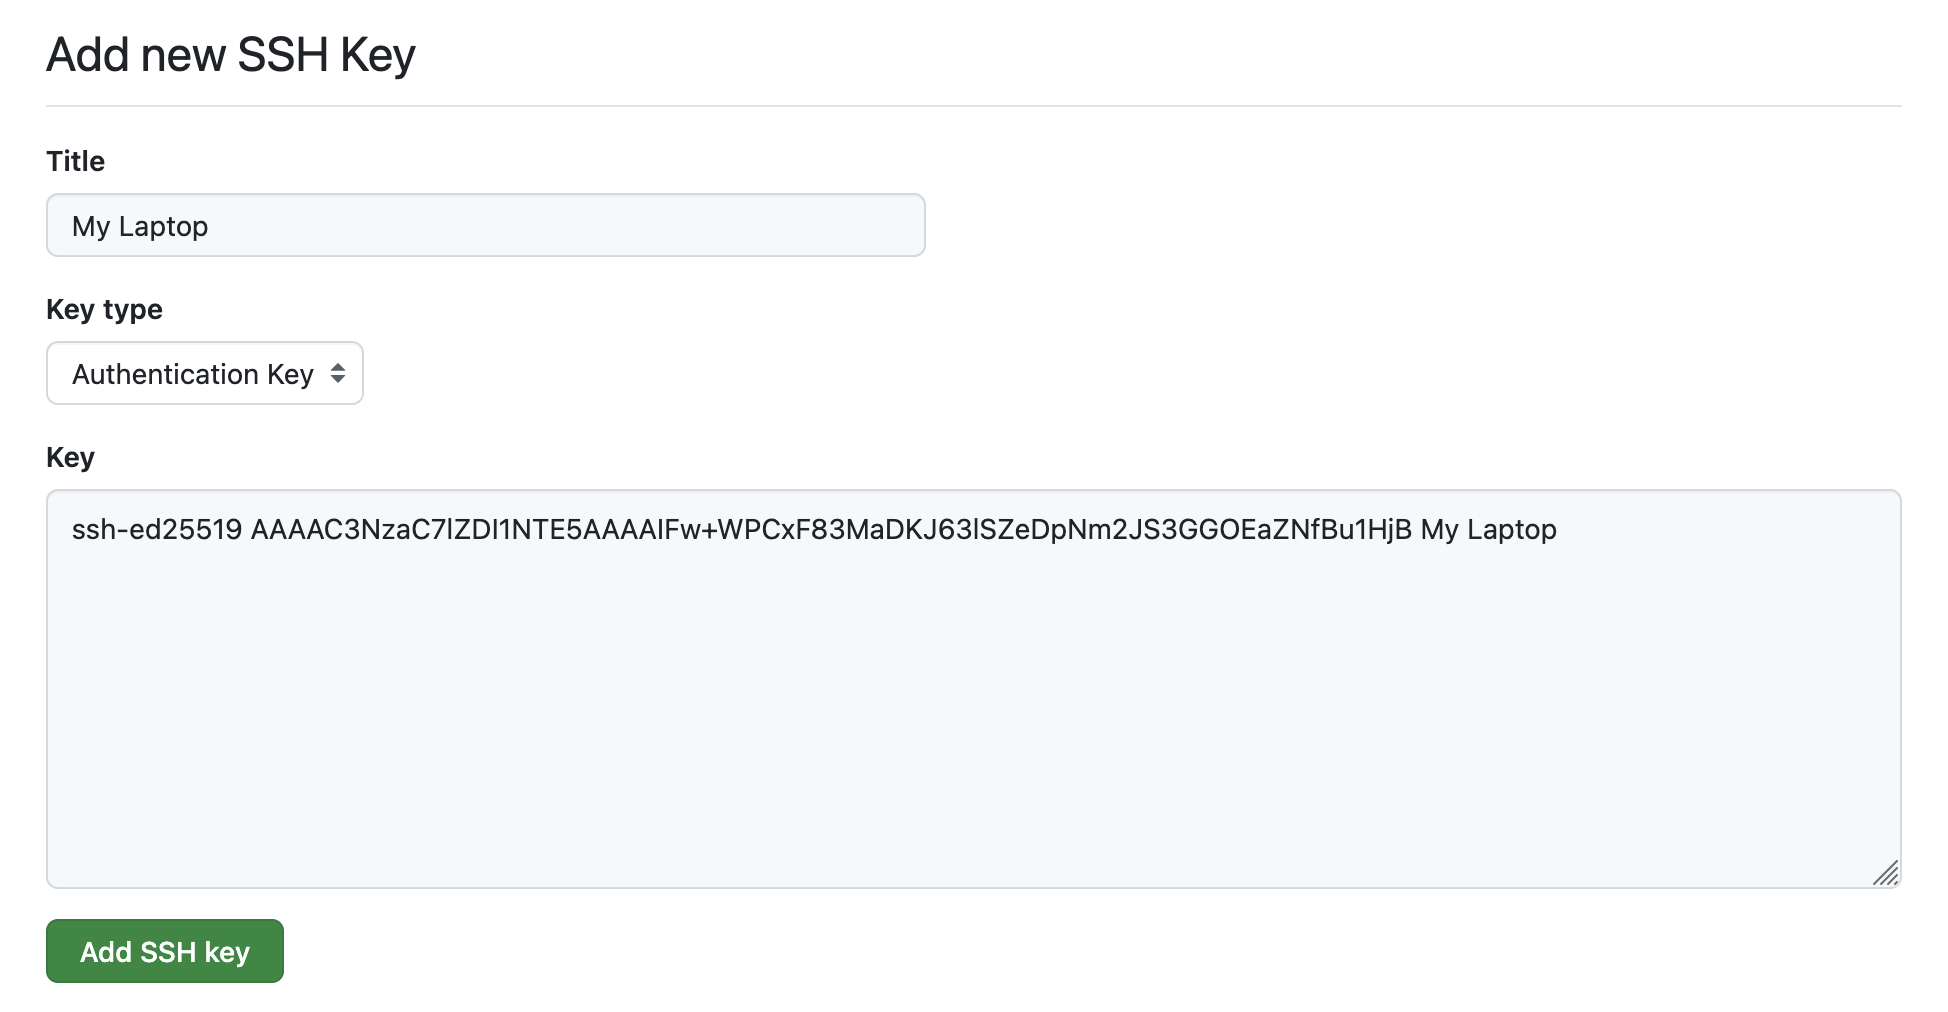
If all has gone to plan, you should now be able to see it listed in your SSH & GPG Keys page:

-
Once that is done, copy and paste (Right Click to Paste) the following lines one by one into Git CMD (replace
123456789with your student ID number, andyour.name@postgrad.manchester.ac.ukwith your UoM email address - remember to setstudent.orpostgrad.as required) and press Enter after each one:git config --global user.name "gis-123456789" git config --global user.email "your.name@postgrad.manchester.ac.uk" -
Once you have done that, congratulations! You have set up Git on your machine and and linked it to your GitHub profile. This is a one-time setup, so you should never need to do this again for this machine.
Setting up Git on your own Mac
Here are the steps to set up Git on your own Windows machine:
-
Set up an account on GitHub with the username
gis-[student number], for example, if you had student number123456789, then your user account would begis-123456789. Please do this even if you already have another GitHub account - but only do it once for this course!. -
Log in to GitHub and leave your Github page open in your browser. If you have completed Step 1 previously, log in and leave the page open now.
-
Now, open Applications → Utilities → Terminal (or just search for Terminal in Spotlight) and open it. A white command box should appear.
-
The first step is to find a way for GitHub to authenticate you (instead of a username and password) when you interact with it via Git. This is achieved using an SSH Key Pair.
We will discuss SSH Key Pairs in the first lecture, but for now it is sufficient to know that it is a pair of files containing random characters, one of which goes on your computer (the private key) and one of which goes on GitHub (the public key) - if you have the matching private key to the public key that you give to GitHub, then you are authenticated and there is no need for a username or password - simple!
To generate a SSH key copy the below command (make sure you get the whole thing), then Paste it into Terminal and press Enter:
ssh-keygen -t ed25519 -C "MyLaptop" -N "" && printf "\n\n" && cat .ssh/id_ed25519.pub && pbcopy < ~/.ssh/id_ed25519.pub && printf "\n\n YOUR PUBLIC KEY IS NOW COPIED TO YOUR CLIPBOARD\n\n"It may ask you some questions (like where you want to store the key file), if so, just press Enter to accept the default values until it finishes.
Once complete, it will have created your SSH Key and stored it on your clipboard (just like if you had copied it) for you. If all goes to plan, you should get a result like this:
Generating public/private ed25519 key pair.
Your identification has been saved in .ssh/id_ed25519
Your public key has been saved in .ssh/id_ed25519.pub
The key fingerprint is:
SHA256:5u5EcF0Ks+Bxm0T/kLHPXcQaisIQpu0nvr2TaDNDms4 MyLaptop
The key's randomart image is:
+--[ED25519 256]--+
|      =o* . .  ..|
|     =.= O *  ...|
|    . +o= B. . o.|
|     . oo .=.... |
|      o S.  + .  |
|     ..*         |
|     +..o.       |
|   .o *=o        |
|   .E..==o       |
+----[SHA256]-----+

ssh-ed25519 AAAAC3NzaC1lZDI1NTE5AAAAIAv93zx6cbmPpS7hGvcE5gKg/dL7iBoTEmqQZJcvExji MyLaptop

YOUR PUBLIC KEY IS NOW COPIED TO YOUR CLIPBOARD
The line that looks like this
ssh-ed25519 AAAAC3NzaC1lZDI1NTE5AAAAIAv93zx6cbmPpS7hGvcE5gKg/dL7iBoTEmqQZJcvExji MyLaptopis the public key itself - just in case you accidentally lose it from your clipboard before the next step. -
Now, you have generated your keys, we need to give the public key to GitHub. Make sure you are still logged in to GitHub in your web browser then click here to go to the right page (or if that doesn’t work, click on your profile image → Settings in the top-right corner of the screen, select SSH and GPG Keys from the menu on the left, then click the Green New SSH Key button).
You should now see this screen:
Paste your key (already on your clipboard) into the Key box on GitHub, then fill in the Title box to
MyLaptop, and click the green Add SSH Key button to finish:If all has gone to plan, you should now be able to see it listed in your SSH & GPG Keys page:
-
Once that is done, Paste the following lines one by one into Terminal (replace
123456789with your student ID number, andyour.name@postgrad.manchester.ac.ukwith your UoM email address - remember to setstudent.orpostgrad.as required) and press Enter after each one:git config --global user.name "gis-123456789" git config --global user.email "your.name@postgrad.manchester.ac.uk" -
Once you have done that, congratulations! You have set up Git on your machine and and linked it to your GitHub profile. These changes will follow you around any machine and computer lab using the P drive, so you should have no need to do this process again!
Git Recap
Here is a quick recap of the main Git commands that we use. For more detail, see the Git Cheatsheet below.
| Command | Purpose | Example |
|---|---|---|
git clone |
Copy a repository from the specified remote to the current directory on your machine | git clone git@github.com:jonnyhuck/understandinggis.git |
git status |
Get the current status of your local repository | git status |
git log |
See a list of previous commits | git log |
git add |
Make git track one or more files (adding them to the repository) | git add . or git add path/to/file/py or git add file1.py file2.py |
git commit |
Make a commit to the repository (effectively taking a snapshot of the current state of your code) | git commit -m "added a new function" |
git push |
Push changes to the remote repository from your local repository | git push origin main |
git pull |
Pull changed from the the remote repository from your local repository | git pull origin main |
Git Cheatsheet
All of the below are commands to run in Git Bash (Windows) or Terminal (Mac). Note that these are only the commands that we use in the course, and only very basic examples of those commands. A much more comprehensive instruction is given in Chacon and Straub (2014).
Git Usage
Clone a repository
git clone git@github/user/repo.git
Check the status of a git repository
git status
Check the log of previous commits in a git repository
git log
Add one or more files to a repository / stage existing files for commit
git add file1.py file2.py
Add all files to a repository / stage all new/changed files for commit
git add .
Commit staged files
git commit -m "message describing changes"
Commit all tracked files (no need to add)
git commit -a -m "message describing changes"
Push commits to remote repository
git push origin main
Commit and push in one line
git commit -a -m "message describing changes" && git push origin main
Pull commits from a repository
git pull origin main
Getting out of trouble with Git
While you are getting used to it, you might find that you run into some trouble with Git. Here are some common issues and solutions to fix them:
You have made some modifications that you regret - you want to revert back to the last commit
Easily done:
git restore file.py
You have staged a file that you don’t want to track
Unstage it with this:
git restore --staged file.py
You are tracking a file (that has already been committed) but now want to remove it from the repository
Make git stop tracking it with this:
git rm --cached file.py
You made a commit that you regret - you want to revert to the previous commit
Again easy (note that the simbol is ~, not -!). If you want to go back a different number of commits, you can do so by changing the number
git reset --hard HEAD~1
Your local repository gets out of sync with the remote
If you are working on a remote from multiple machines, you need to remember to push each time you finish and pull before you start to keep everything in sync. If you forget this, your repositories will get out of sync and you will get an error next time you try to push or pull. There are a few things to try here:
You can either reset your local repository to match the remote (losing any local modifications)…
git fetch --all
git reset --hard origin/main
…or reset your local repository to match the remote (saving any local changes by reverting them into unstaged changes)…
git fetch --all
git reset --soft origin/main
…or overwrite your remote repository to match the local one (losing any changes that were pushed there):
git push --force origin master
Think carefully before doing anything that will lose your code - and please do take the time to ask if you aren’t sure! Remember that your Git History is an important part of the marking criteria for your assessments, so it is vitally important that you do not delete your entire history!!!